Orientation: Getting Started with Your Platform

Site: Institute of Ministry
Course: Licentiate in Diaconal Ministry (LDM)
Book: Orientation: Getting Started with Your Platform
Printed by: Guest user
Date: Thursday, 30 July 2026, 4:51 AM

1. Welcome to Orientation

Before you begin Module 01, we ask every candidate — whatever your background, whether you have used a system like this before or have never touched one — to work through this short Orientation.

Nothing here is theology. It is simply the practical knowledge you need so that the platform itself never gets in the way of your formation: how to find your way around, how to move backward and forward through a unit and through the course, how assignments and quizzes work, how to track your own progress, and — at some length, because it matters throughout the whole programme — how to use the AOCM Scripture Study tool, our StepBible-based original-language study widget.

Take your time, but do not fear it either. This should take well under an hour, and most of that time is spent clicking around rather than reading. By the end, Module 01 will unlock automatically — you do not need to ask anyone to let you in.

A note for anyone who has never used an online learning platform before: you are not expected to know any of this already. Every step below is written out in full, in the order you will actually meet it, assuming nothing. If you have used Moodle, Canvas, or a similar system before, you may find some of this familiar — skim it, but please still complete the practice quiz and assignment at the end, since those are what unlock Module 01.

When you are ready, use the › arrow at the right edge of this page (or the Table of contents on the right, if you are on a computer) to move on to the next chapter.

2. Signing In and Finding Your Way

You will normally reach the Institute of Ministry at institute.apostolicoldcatholic.org. Save this address somewhere you will find it again — a bookmark, a note, whatever works for you.

Sign in with the username and password you were given when your account was created. If you ever forget your password, the sign-in page has a “Forgotten your username or password?” link that will walk you through resetting it by email.

Once you are signed in, you will land on the Institute’s home page — not a bare “dashboard,” but the same page anyone visiting the site sees, now showing you as signed in. Scroll down and you will find a card for your course, Licentiate in Diaconal Ministry (LDM), under “Formation Pathways.” Click it, and you are in your course.

Along the top of every page sits a dark navy bar. From left to right:

  • The Institute of Ministry logo and name — click this at any time to return to the home page.
  • A bell icon — your notifications. Moodle uses this for system messages: a new grade, a forum reply, an assignment reminder.
  • A speech-bubble icon — your private messages, for direct notes to and from your mentor, tutors, or fellow candidates.
  • Your profile picture — click it to open a menu with your Profile, Grades, Calendar, Private files, Preferences, and Log out.

Whenever you feel lost, the crest in the top-left corner will always bring you back to familiar ground.

3. Your Course at a Glance

Open your course and take a moment simply to look at the page before clicking anything.

At the top is a banner with the course name, and beneath it a row of tabs: Course (where you are now), Participants, Grades, and Activities. As a candidate you will mostly stay on the Course tab; Grades is worth knowing (Chapter 7 covers it), and Participants lets you see who else is enrolled, including your cohort.

Below that, the course is laid out in sections — you are inside one now, called “Orientation — Before You Begin.” Scroll down and you will see the next section, “Module 01,” then Module 02, and so on through to Module 11, with a Christmas and New Year recess in between. Each section carries a description of what that module covers, what is required, and what you need to submit before moving on.

On the left of the screen (on a computer — on a phone or tablet you may need to tap a menu icon to reveal it) is the course index, a collapsible list of every section and every item inside it. It is the fastest way to jump straight to a specific unit without scrolling through the whole page. Try it now: click on a module name in the left-hand list and watch the main page jump to that section.

Some items in the course will show as greyed-out or carry a small note about restrictions. That means they are restricted — usually because an earlier step needs to be finished first, exactly as Module 01 is restricted until you complete this Orientation. This is deliberate, not a fault.

4. Moving Through a Unit — the Book Activity

Animated recording showing how to move forward and backward through Book chapters, and how to jump to a chapter using the table of contents.

The short recording above shows this in action: moving forward and back through chapters with the arrows, and jumping to a chapter from the table of contents.

Most of the teaching content in this programme, including this Orientation, is built as what Moodle calls a Book — a series of short chapters you read one at a time, much like a printed book divided into chapters rather than one very long page.

You are reading Chapter 4 of one right now. Notice three things:

  • Arrows to the left and right of the page, ‹ and ›, take you to the previous or next chapter.
  • A breadcrumb trail near the top of the page (course name / section name / book name) shows exactly where you are, and lets you click back up a level at any time.
  • On the right of the page (on a computer) is a Table of contents block listing every chapter in this Book by name. Click any chapter title to jump straight to it, in any order — though we strongly encourage reading in sequence, since each part builds on the last.

You cannot “get lost” inside a Book in any way that loses your work. Nothing you read is ever deleted, and you can revisit any chapter as many times as you like, at any point in the programme, simply by navigating back to it.

Try it now: use the Next arrow to move to Chapter 5, then use Previous to come back here. That is the entire mechanic — you now know how to move through every unit in this course.

5. Assignments — How Submission Works

Several units ask you to submit written work — a reflection, a plan, a covenant, a recording. In Moodle these are called Assignments, and they all work the same way, whatever the module.

Open an Assignment and you will see three things: the instructions (what is being asked of you, how long or detailed it should be, and by when), a submission status table showing whether you have submitted yet, and a button, usually labelled Add submission.

Click Add submission and you will be offered one or both of two ways to hand in your work, depending on how that particular assignment is set up:

  • Online text — you type or paste your work directly into a text box on the page, exactly like this Book’s content.
  • File submission — you upload a document (Word, PDF, video, audio, whatever the assignment calls for), either by clicking to browse your device or by dragging the file onto the upload area.

Once you are satisfied, click Save changes, and — for assignments that need it — a further Submit button to formally hand it in for marking. Until you click that final Submit button your work sits in a Draft state, which you can keep editing; after Submit, it is locked as your official attempt unless your tutor reopens it for you.

To practise this without any pressure, use the Practice Assignment in this section. It is not graded and nothing you submit there is ever reviewed — it exists purely so your first real assignment, in Module 01, is not also your first time seeing this screen.

Animated recording showing a candidate submitting an assignment: clicking Add submission, entering online text, and clicking Save changes.

The short recording above shows this end to end: clicking Add submission, entering online text, and saving it.

6. Quizzes — How Timed Assessments Work

Every module in this programme ends with one or more knowledge-check quizzes. Every quiz in the LDM follows the same shape, agreed once and used everywhere: 20 questions, drawn at random from a bank of 60, on a 25-minute timer, with an 80% pass mark and a maximum of two attempts (one original attempt and one retake).

Here is what actually happens when you open a quiz:

  • You will see a summary page first — the number of attempts allowed, the time limit, and the pass mark. Nothing starts until you click Attempt quiz now.
  • Once you click it, the clock starts. A countdown timer appears, usually in the corner of the screen, and does not stop or pause once begun — so make sure you are ready, undistracted, and have the full 25 minutes free before you click.
  • Questions appear with a navigation panel letting you jump between them and flag any you want to revisit.
  • You can change your answers as many times as you like before submitting, and move backward and forward freely within the attempt.
  • When you are ready — or when time runs out, whichever comes first — click Finish attempt, then Submit all and finish on the confirmation screen.

After submitting, you will usually see your score straightaway, along with which questions you answered correctly and often the correct answers themselves, depending on how that particular quiz is configured. If you do not pass, you are permitted one further attempt, drawing a fresh set of 20 questions from the same bank of 60.

To feel this rhythm once, gently, before anything is at stake, take the Practice Quiz in this section. It asks about the platform itself, not theology, and you may take it as many times as you need.

Animated recording showing a candidate starting the Practice Quiz, answering a question, and submitting the attempt for grading.

The short recording above shows this in action: starting the quiz, answering a question, and submitting the attempt.

7. Tracking Your Progress

Three separate things together tell you, and your mentor, how you are doing. It helps to know how they differ.

Completion ticks. Look at the course index on the left of any course page, and you will notice small marks beside activities once you have met the conditions set for them — viewing a Book fully, passing a quiz, submitting an assignment. This Orientation uses completion tracking itself: once you have viewed this Book and passed the Practice Quiz, the system marks Orientation complete and Module 01 unlocks.

“Before you move on” checklists. At the end of most units (including the final chapter of this Orientation) you will find a plain-language checklist of everything that unit expects of you. These are not a separate technical feature — they are simply a clear summary, written into the text, of what “done” looks like for that unit.

Grades. Click Grades in your profile menu, or the Grades tab on the course page, to see a running gradebook: every graded quiz, assignment, and assessment in the course, your result, and — where your tutor has enabled it — written feedback. This is the authoritative record of your formation progress, and the one your mentor and the course director also see.

8. Calendar and Notifications

Click Calendar in your profile menu to see a month view of everything with a date attached — quiz windows, assignment due dates, monthly cohort discussions, and any event the Institute posts for the whole site. Course-specific events are colour-coded, so you can tell at a glance what belongs to the LDM.

The bell icon in the top bar is your notification feed — a running log of things that have happened that concern you: a grade has been released, someone replied to a forum post, a deadline is approaching. Click it to see recent notifications, and click any one of them to go straight to what it refers to.

By default, Moodle also emails you many of these same notifications, so you do not need to check the site constantly. You can adjust exactly what you are emailed about under Preferences → Notification preferences in your profile menu, though we encourage you to leave assignment- and quiz-related notifications switched on throughout the programme.

9. The AOCM Scripture Study Tool — What It Is and Why We Use It

Throughout this programme you will meet the Hebrew and Greek behind your English Bible — not because you are expected to learn either language, but because part of handling Scripture responsibly is knowing that every translation involves choices, and being able to look behind a translation when it matters.

Our tool for this is STEPBible (stepbible.org), a free Bible-study platform built by Tyndale House, Cambridge, containing the full text of Scripture in multiple translations, interlinear Hebrew and Greek, lexicons, and cross-references. It requires no account and no payment.

We have also built a companion tool of our own, the AOCM Scripture Study widget, which brings the specific words and passages relevant to a given unit directly into the page in front of you, so you rarely need to leave the unit to begin your word study.

You will meet the AOCM Scripture Study widget many times across the programme, always presented the same way. The next chapter walks through exactly what you are looking at, using a live, working example — the very same tool you will use in real formation work.

10. Reading a Scripture Study Panel

Below is a real AOCM Scripture Study panel, of the same kind you will meet throughout the course, so you can see exactly what one contains before meeting it for the first time in graded work.

AOCM Scripture Study

Scripture study: Luk.14.28-30

Passage: Luk.14.28-30Open in STEP Bible →

G5585Strong numbers are a universal index for the original language words behind your Bible. Every Greek New Testament word has a G number; every Hebrew Old Testament word has an H number. Use the number to look up the same word in a lexicon, concordance, or STEP Bible.
Greek

ψηφίζω

Pronunciation guide: psēphizō

Basic meaning: to calculate

ψηφίζω (ψῆφος), [in LXX: 3Ki.3:8 8:5 A (סָפַר ni..) * ] to count (prop., with pebbles), reckon, calculate: τ. δαπάνην, Luk.14:28 τ. ἀριθμόν (i.e. calculate the number's meaning), Rev.13:18 (in cl. chiefly mid., to vote by casting a pebble cf. συγ-κατα-, συμ-φηφίζω).†

(AS)

Explore G5585 in STEP Bible →

Source: STEP Bible Data — TBESG CC BY 4.0

G1160Strong numbers are a universal index for the original language words behind your Bible. Every Greek New Testament word has a G number; every Hebrew Old Testament word has an H number. Use the number to look up the same word in a lexicon, concordance, or STEP Bible.
Greek

δαπάνη

Pronunciation guide: dapanē

Basic meaning: cost

δαπάνη, -ης, ἡ [in LXX: Est.6:4, 8 (נִפְקָא), Dan LXX Bel 1:21, al. ] expense, cost: Luk.14:28.†

(AS)

Explore G1160 in STEP Bible →

Source: STEP Bible Data — TBESG CC BY 4.0

G5056Strong numbers are a universal index for the original language words behind your Bible. Every Greek New Testament word has a G number; every Hebrew Old Testament word has an H number. Use the number to look up the same word in a lexicon, concordance, or STEP Bible.
Greek

τέλος

Pronunciation guide: telos

Basic meaning: goal/tax

τέλος, -ους, τό [in LXX for קֵץ, etc. εἰς τὸ τ., chiefly for נֶצַח and cognate forms ] by meton., of one who makes an end, Rom.10:4 ἕως (ἄχρι, μέκρι) τέλους, 1Co.1:8, 2Co.1:13, Heb.3:14 6:11, Rev.2:26 εἰς τ., to or at the end, Mat.10:22, Mrk.13:13, Luk.18:5, Jhn.13:1 (or here, to the uttermost, see Westc., in l) τ. ἔχειν, Luk.22:37 adverbially, τὸ δὲ τέλος, finally, 1Pe.3:8 of the last in a series, Rev.21:6 22:13 of the issue, fate or destiny, Mat.26:58 with genitive of thing(s), Rom.6:21, al. with genitive of person(s), 2Co.11:13, al. of the aim or purpose, 1Ti.1:5. pl., as most usually, Mat.17:25

  1. end: most frequently of the termination or limit of an act or state (in NT also of the end of a period of time, cl. τελευτή), Luk.1:33, 1Co.10:11, 2Co.3:13, 1Pe.4:7
  2. toll, custom, revenue: Rom.13:7

(AS)

Explore G5056 in STEP Bible →

Source: STEP Bible Data — TBESG CC BY 4.0

Formation question

You are at the very beginning of a long formation. What have you already, honestly, counted the cost of — and what have you not yet allowed yourself to count?

Lexical and morphology data may include material derived from STEPBible Data. Credit: STEPBible, www.STEPBible.org.

Notice the parts of the panel above:

  • A gold “AOCM SCRIPTURE STUDY” label at the top identifies the box, with the passage reference underneath and an “Open in STEP Bible →” link that opens the whole passage on the full stepbible.org site in a new tab.
  • Below that, one card per word chosen for study. Each card shows a Strong’s number (for example G1160) with a small “?” beside it that opens a plain-language explanation of what Strong’s numbers are, if you ever forget; whether the word is Greek or Hebrew; the word itself in its original script; a pronunciation guide in italics; a short basic meaning; a fuller lexicon entry giving the same kind of detail a printed Greek or Hebrew dictionary would; and an “Explore [number] in STEP Bible →” link opening that specific word on the full site.
  • Often, a gold-bordered Formation Question beneath the word cards — a reflection question inviting you to apply the word study to your own formation, not merely to record facts about it.

You are not expected to memorise any Strong’s number. You are expected to read each card, let it slow you down, and let it deepen — not replace — your reading of the passage in English.

Try it now, on the live panel above: click the small “?” beside a Strong’s number, then click one of the “Explore … in STEP Bible” links to see where it takes you. It opens in a new tab, so you will not lose your place here.
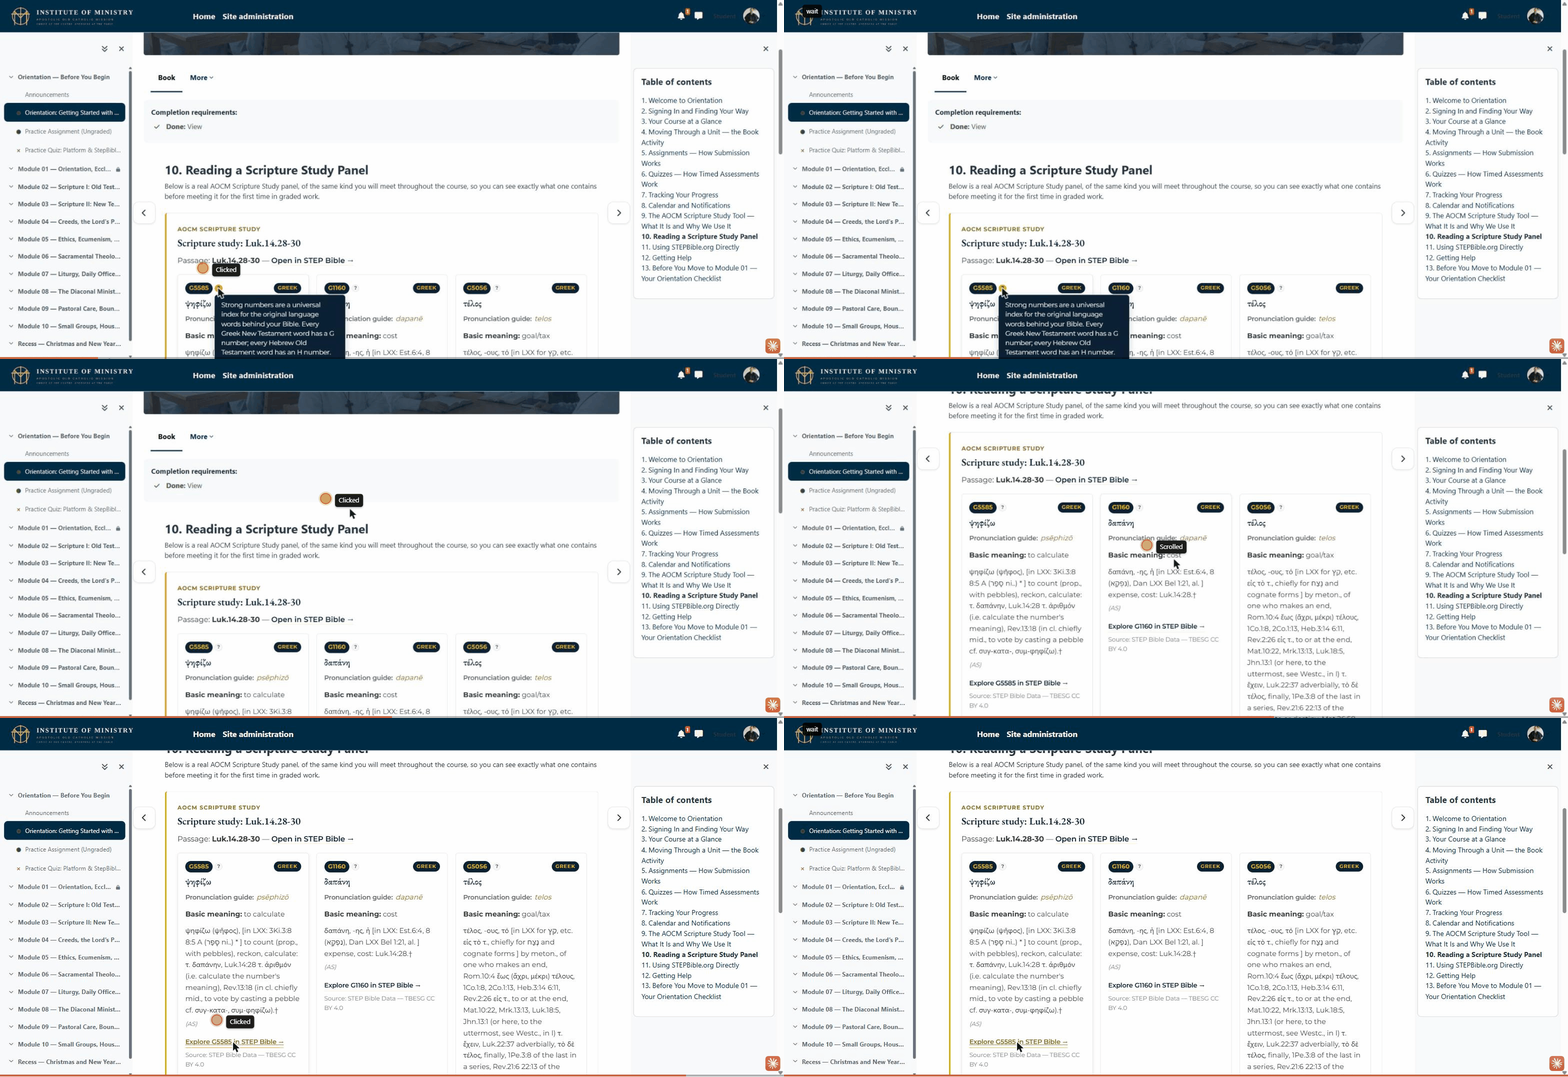
Animated recording showing the AOCM Scripture Study panel: clicking the "?" beside a Strong's number and opening an "Explore in STEP Bible" link.

The short recording above shows this in action: opening the "?" tooltip beside a Strong's number, then following an "Explore in STEP Bible" link.

11. Using STEPBible.org Directly

Some units will simply ask you to go and work in STEPBible itself, rather than presenting a ready-made panel — this is deliberate, so that by the end of the programme you are genuinely competent with the tool itself, not merely able to read panels we have prepared for you.

To use it:

  • Go to stepbible.org in a new tab. No account or sign-in is required.
  • Type a reference (for example, “Luke 14:28” or “Genesis 1:1”) into the search box, or use the version selector to choose a Greek or Hebrew interlinear text.
  • Select an interlinear view to see the original-language word beneath each English word.
  • Hover over (on a computer) or tap (on a phone or tablet) any original-language word to reveal its Strong’s number, a short gloss, and morphological information such as tense and case.
  • Click through on a Strong’s number to open the full lexicon entry — exactly like the cards you met in the last chapter.

STEPBible also lets you compare multiple English translations side by side, search for every occurrence of a Strong’s number across the whole Bible, and consult study notes — features you are welcome to explore, though they are not required for this programme.

12. Getting Help

If anything on the platform does not behave as this Orientation describes, or you are simply stuck, do not spend hours wrestling with it alone.

  • For questions about course content, deadlines, or your formation itself, message your formation mentor directly, or use the message icon in the top bar.
  • For technical problems with the platform — a page that will not load, a file that will not upload, a quiz that behaves strangely — contact the Institute at hello@apostolicoldcatholic.org, describing what you were trying to do, what you expected to happen, and what happened instead. A screenshot is always welcome.
  • If you are ever unsure whether something is a technical problem or a formation question, simply ask — nobody will mind sorting it for you.

There is no such thing as a foolish question here. Every candidate before you has had to learn this platform from nothing, exactly as you are doing now.

13. Before You Move to Module 01 — Your Orientation Checklist

Complete every item below before the system will allow you to proceed:

  • Read all twelve parts of this Orientation in full.
  • Practise moving forward and backward through this Book using the chapter arrows and the Table of contents.
  • Open the live Scripture Study panel in the “Reading a Scripture Study Panel” chapter and try both the “?” tooltip and an “Explore in STEP Bible” link.
  • Submit the Practice Assignment (ungraded — a single sentence is enough).
  • Complete the Practice Quiz with a passing score (80%). You may retake it as many times as you need; it exists to teach the mechanics, not to test your knowledge.

Once the Practice Quiz shows a pass and this Book shows as viewed, Module 01 will unlock on your course page automatically — usually within a minute or two. If it does not, see the “Getting Help” chapter for how to reach us.

Welcome again. What comes next is the real work of formation — we are glad you are ready to begin it.